Wednesday, May 23, 2012

Glass Bottle Vase


Today my mom was doing some tile work in the kitchen, and I decided to try to use the tile cutter to cut some glass bottles lying around.

1. I taped off where I wanted to make the cut.
2. adjust the tile cutter's guide to match where you want the blade to cut your bottle.
3. add water to the tile cutter, and start cutting by rotating the bottle around slowly.
4. After cutting, remove the tape, and wash the bottle carefully. The cut part is sharp so do not touch it.
5. Start sanding. I used a sanding attachment with a drill, and sand all sides dipping in water once in a while.
Wash again, and you are done!


Taped off before cutting

unwashed after cutting

after washing

unsanded

My beer bottle cracked at the end of cutting. The glass was much thinner on the beer bottle, so I would recommend using a bottle with thick glasses for cutting.

After sanding

It is not perfect, there are areas where it chipped a little but it's fine for what I'm using it for.


Sunday, May 20, 2012

Flowers

I love taking pictures of nature, especially flowers. I am still learning how to use my camera (Nikon D5100), it's definitely a challenge so far. Here are two of my favorite shots so far.


I just ordered the 35mm F/1.8 lens online, and I can't wait to try it out! I am also thinking about getting some macro attachments, if anyone have any experience with those, please let me know!

Wednesday, May 9, 2012

Glass Pendant-Making Class

Last week, my friend and I bought a Groupon for a Pendant Making class at Smashing Times in Dallas. When we arrived at the class, We realized we were the only ones attending this class on that day. It was such a fun time picking out our glass, and learning the process. Here are some pictures!
Before the pendants went in the Kiln
After the pendants were fired and bails were attached
The purple/pink one was mine, and the one with blue in it is my friend's. I am overall okay with the results, the only thing about them is that they are not smooth like I thought they were going to be after firing. The samples that they provided were all very smooth, and leveled. I just wish the "instructor" would have told us more about how they were going to be like when we were making them.


Sunday, May 6, 2012

Dollar Store Find: Grow your own Crystal

This was in the craft section at Dollar Tree. They also had pink and green, but this was the only purple left. I have bought something similar to this before from Earthbound, but it was more expensive, and crystals were not what I expected.. (they just looked like white salt accumulated on the rock) I am hoping for better results this time.

Crystal Growing Kit
Crystal Growing Kit Back

opened kit

Here is what It came with. Tray, Stir Stick, 2 Rocks, and a pack of "Crystal Chemical". 


I made a mistake on this part, you are supposed to use HOT water to dissolve the chemical, but I was lazy and didn't want to use another container, so I didn't want the tray to melt if I put boiling water inside. so I only used warm water. After stirring it for 5 min, the chemicals did not dissolve all the way. 


After putting the rock in the water, I followed the instruction and sprinkled the rest of the chemical on the rock, and it accumulated itself on the rock, making it look like its growing crystals already.


The tray is very flimsy, so make sure you place the tray in something sturdy so if you can move it around if you desire.

I hope I'll get some beautiful crystals, but if not, its okay, because I still love watching the process of crystals forming. I will keep you updated on how this turns out!

UPDATE:

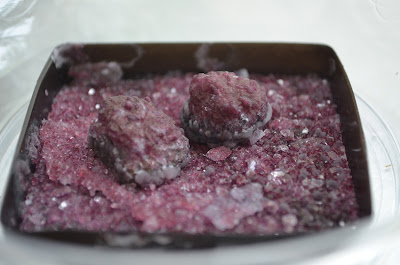
Here is my end result of my crystals.


A little disappointed that the crystals didn't end up on the rocks, but still pretty cool.


Wednesday, May 2, 2012

Dollar Store for Inspiration?

I love going to different stores for inspiration. Anthropologie is definitely one of my favorite. But have you guys ever heard of someone going to the Dollar Store for inspiration? Sure, you can get inspired by all the finished products that you see on the shelves saying, "Oh I can make that!", but for me, supplies and "raw materials" are also great inspiration to me. Of course supplies and materials that cost a dollar is just the icing on the cake!

A little searching around showed I am not the only one who browse through dollar store to find things to use in their projects. There are websites such as Dollar Store Crafts, where people use all kind of stuff from the dollar store to make wonderful projects. I even found a Dollar Store Challenge, too bad that was over a while ago, or I would have entered my projects there!

I will be showcasing several of the project that I have done using things I found at the dollar store on this blog. So please stay tuned for more!

So this lead to the surprise that I mentioned from an earlier post. I had finally finished this project after having it sit there for a while. So here it is!


This pillow is made for less than $4! The casing is 2 Microfiber cloth from the dollar store! It is actually really really soft and fluffy. If you have some stuffing from around the house (in old pillows that you longer use) this project could be done for $2.00! 

The  microfiber cloth came in a rectangle shape, so all I did was cut it to a square and sewed them together leaving about 3-4 inches open on one side. After stuffing it,  I just hand sew the sides together. Super easy! it only took me so long because I couldn't find my needles to sew the sides close. 

The finished pillow is about 13in. X 13in. It is not huge, but just the right size for my bed. 

Please let me know what you think. I'd love to hear your thoughts!